HOME        |        ABOUT        |        COPYRIGHT        |        CONTACT        |         RECIPE INDEX        |         INDIAN THAALIS        |         MILLET RECIPES        |        EVENTS' ROUNDUP        

Showing posts with label Rice. Show all posts

Wednesday, January 19, 2022

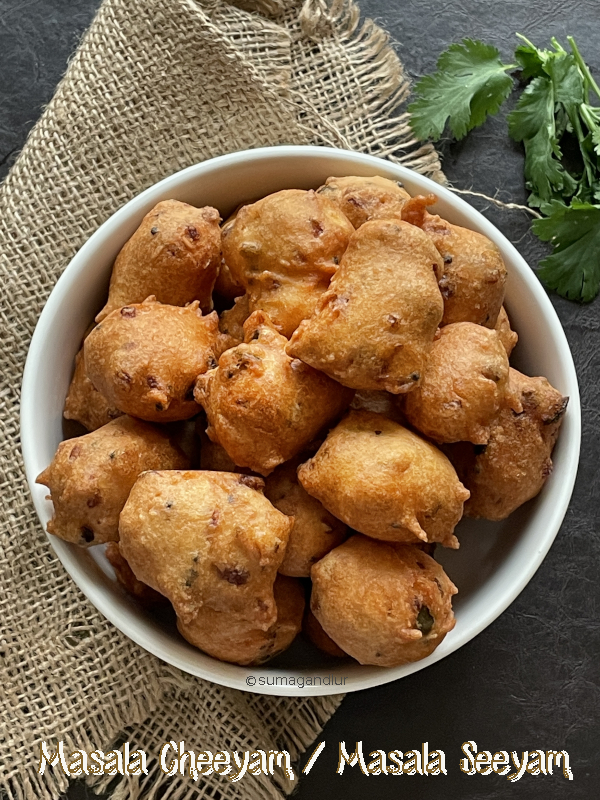
'A - Z' Tamil Nadu Recipe Series ~ C for Chettinad Masala Cheeyam / Masala Seeyam

Southern India is predominantly a rice growing region and the various local cuisines reflect the fact. I did not realize until now that the recipes I planned for this week were all rice based. Akkaravadisal is a sweet rice pudding usually served as an offering to god while brinji is a rice and vegetable based spicy one pot meal. Today's post cheeyam or seeyam is also rice based and is a popular snack from Chettinad cuisine.
 
Chettinad cuisine is perhaps the most well known one among the various regional cuisines of Tamil Nadu, though surprisingly Chettinad / Chettinadu region relatively forms a smaller portion of the state in a geographical sense. It is located mainly in the Sivaganga district and some portion of Pudukottai district. Chettinad is the home of a prosperous banking and business community called Natukottai Chettiars / Nagarathars and in fact, Chettinadu literally means 'Land of Chettiars'.

The Chettiars are known to be traders of salt and spices which is reflected in their cuisine where dishes are made with freshly ground spices. They also use a lot of dried meats and salted vegetables owing to the dry environment of the region. Most of the dishes are either eaten with rice or rice based. The cuisine boasts of both vegetarian and non vegetarian dishes.
Some of the dishes I have previously tried from Chettinad region are

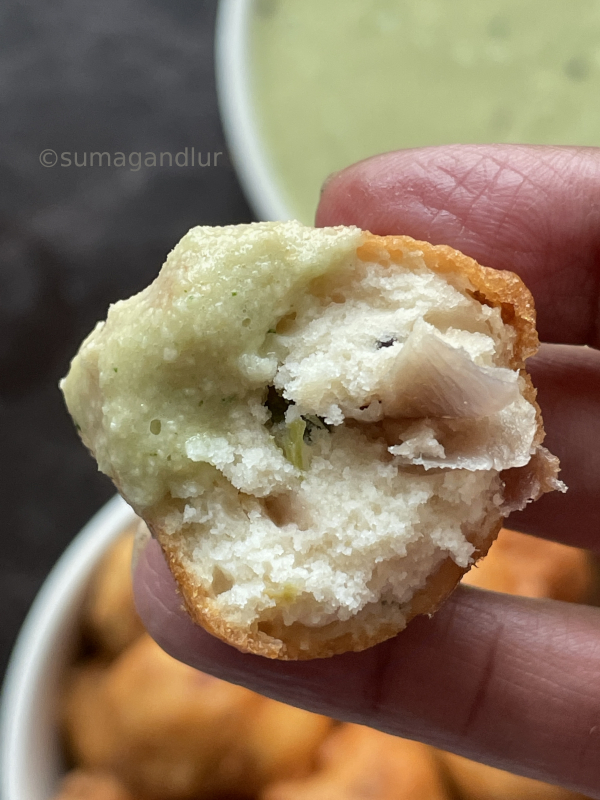
Today's masala cheeyam / masala seeyam also come from Chettinad region as I mentioned above. They are a popular snack from the region, made with a ground batter of rice and skinned black gram. This is a spicy version while there is also a sweet version of seeyam. These delicious fritters make a great evening snack and I read somewhere that people who are fasting also prepare this as an evening meal. 

This spicy version needs advance planning as the rice and black gram needs to be soaked for 2 - 3 hours. Grind the batter fluffy and fine like one does idli batter. Remember not to make it runny. Onions and green chilis are sautéed and added to the batter which add flavor to these fritters though I think the step of sautéing onions can be skipped. Adding raw onions to the batter is not  going to make that of a big difference as they are going to be deep fried anyway.
Ingredients:
1/2 cup rice
1/2 cup skinned black gram / urad dal
Salt to taste
Oil to deep fry 
Ingredients for sautéing:
1 tbsp. oil
1/2 tsp. mustard seeds
1 small sprig of curry leaves, finely minced
1 or 2 green chilies, finely minced
1 medium sized onion, finely minced
2 tbsp. fresh, shredded coconut

Directions:
1. Rinse and soak rice and skinned black gram in water for at least two hours. Drain the water completely after the soaking period.
2. Grind them together into a thick, fluffy batter adding water in small increments. Do not make the batter runny. (Using a grinder would help to use small quantity of water to while grinding. If the batter turns runny, adding a small quantity of rice flour would help but adding too much would turn the cheeyam harder.)
3. Meanwhile, heat a tbsp. oil in a pan and add mustard seeds. When they start to sputter add, green chili and curry leaves. Stir them for few seconds and add onions and salt enough for the onions.
4. Sauté until onion turns translucent and add the coconut. Stir once and turn off the stove.
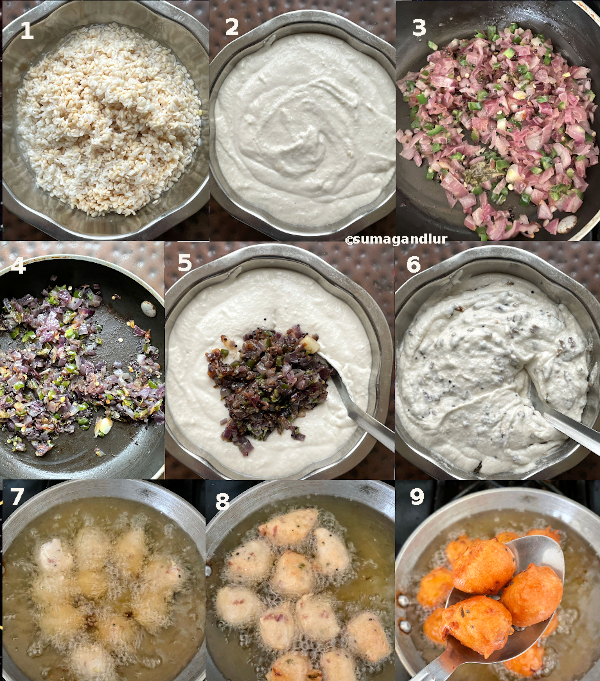
5 & 6. Add the sautéed onions and salt to the batter. (Keep in mind that onions contain salt too). Mix the batter well with a spoon and keep aside.
7. Heat oil for deep frying in a frying pan on medium heat. Drop a pinch of batter to the oil. If it swims to the surface, the oil is ready for frying. If not, heat the oil a little more. Dip your fingers / hand into the batter and shape a small ball. Gently drop into the oil. Repeat the step and drop as many balls as the pan can hold, without overcrowding. (There is no need to fret over the shapes. They don't to be exactly round.)
8. First they sink and soon float to the surface. Keep gently flipping them with a perforated spoon. Lower the heat to low - medium setting and fry until they turn golden brown throughout.
9. Remove them when done and transfer them onto a plate laden with paper towels to absorb the extra grease.
10. Reheat the oil if needed and repeat the steps with the remaining batter.
11. Serve them warm and enjoy with a spicy chutney or some ketchup.

This is going to be my contribution to this week's Blogging marathon, with the theme 'A -Z Series'. Check the page link to see what other marathoners are cooking.


Tuesday, October 19, 2021

Chilka Roti

Chilka roti is a simple, rustic crepe from Jharkhand state that I discovered while cooking my Thaalis. These have become a regular on my weekend breakfast menu in the recent months because of the ease in preparation. They are made with rice and chana dal / split chickpeas. It is a simple, straight forward recipe if one is familiar with the south Indian dosa making. The rice and lentil need to be soaked overnight or at least a couple of hours in the morning. It can be then ground with salt and enough water. I usually add a tsp. of cumin seeds to the ground batter though it is not used in the recipe. The crepes can be made immediately using the ground batter as there is no need to ferment this batter.
 
Rice and split chickpeas / chana dal are used in 2:1 ratio but sometimes I use them in equal proportions. The batter can even be ground and refrigerated in advance to save the time in the morning rush hour. Just make sure to use up the batter in about 2 or 3 days after grinding though I remember the batter lasting a little longer in my refrigerator. They can be made for breakfast, brunch or they can even be a fuss-free dinner idea. Serve these easy, healthy and filling crepes with chutney of your choice. Mine were served with roasted gram chutney and tomato chutney.

Ingredients: 
1 cup rice
1/2 split chickpeas / Bengal gram / chana dal
Salt to taste
Water to grind
Oil to make chilka roti
Directions:
1. Add rice and split chickpeas to a bowl and rinse twice with water and drain. Soak them in water for 3 hours or overnight. 
2. Drain the water used to soak before grinding. 
3. Add the soaked ingredients and salt to a blender / grinder and grind finely adding water as required to form a thick, pourable consistency batter. (This batter gets runny very easily and so start adding a small amount of water to grind initially and go on adding as needed). Transfer the batter to a container.
4. Heat a griddle and pour a ladleful batter at the center and spread it thinly with the back of the ladle. Drizzle oil around the edges and cook until the surface appears dry. 
* Flip the roti and cook on the other side as well for few seconds.
* Remove it with a spatula and repeat the roti making process.
* Serve them warm with chutney of your choice.
This post is an entry for Blogging Marathon and check the link to find out what other marathoners are cooking.

Monday, July 19, 2021

Uthappam Waffles / Dosa Waffles

Dosa waffles or uthappam waffles are those made with leftover, savory dosa batter and these make a filling breakfast or dinner. Dosa batter is needed for this recipe to start with and here is the recipe for dosa batter. These waffles can be made in less than half an hour if you have the batter ready.

Waffles are a fun way to use any leftover dosa batter besides using them to make uthappam, ponganalu, onion dosa and such. Mixed veggies can be added to make the waffles more nutritious. Serve these gluten-free, vegan waffles with coconut or peanut chutney for a delicious breakfast or dinner.
Ingredients: (About 3)
2 cups dosa batter
Salt if needed
1 small red onion, chopped
1 small tomato, chopped 
1 small carrot, peeled and grated 
1 or 2 green chilis, finely chopped
2 tbsp. cilantro, finely minced
Oil to grease the waffle pan
Directions:
1. Left over dosa / idli batter is needed for this recipe. Add salt only if it was not added earlier to the batter. Add few tbsp. of water if the batter appears too thick.
2 & 3. Add chopped vegetables, green chilis, and cilantro to the batter and mix well with a ladle.
4. Preheat the waffle maker and brush the grooves with oil. 
5. Pour the prepared batter into the waffle maker.
6. Cook the waffles according to the instructions in the manual of your waffle maker. 
* Once done, gently remove the cooked waffle from the waffle maker. Use the remaining batter and prepare waffles. 
* Serve them warm with chutney of your choice.
This post is an entry for Blogging Marathon. Check the link to find out what other marathoners are cooking.

Monday, April 5, 2021

Musthi Polo

I thought of posting one more dosa recipe today which happens to be a popular and traditional breakfast dish from Konkani households. Polo means dose / dosa in Konkani while musthi means 'fist' in both Konkani and Kannada. Most of the ingredients used in the recipe were measured by fistfuls which would amount to approximately to 1/4 cup and hence the name. These polo are soft and fluffy and are prepared on the similar lines as the set dose, a breakfast popular in the eateries across Bangalore. Served along with coconut chutney or any other chutney of preference, these spongy dosas make a delicious breakfast.

Ingredients:
1 cup rice *
1/4 cup skinned black gram / urad dal
1/4 cup flattened rice / poha
1/2 tsp. fenugreek seeds / methi seeds
1/4 cup fresh coconut
Salt to taste
Water to grind (I used a little more than a cup of water.)
* (I use extra long grain rice. Any rice can be used but not aromatic variety). 
Directions:
* Rinse and soak rice, black gram, flattened rice and methi seeds for about 4 hours. Drain the water used to soak before grinding.
* Grind finely the soaked ingredients along with coconut, salt and enough water to form a pourable but not runny batter. 
* Transfer the batter to a container, cover and let it ferment in a warm place overnight or for more time if living in a cold place.
* Heat a griddle and pour a ladleful batter at the center and spread only a little with the back of the ladle. These dosa are made smaller and thicker than the regular dosa. Drizzle oil around the edges and cook until the surface appears dry. The surface turns all porous if the batter is fermented well.
* The dosa can be removed at this point or flipped and cooked on the other side as well for few seconds.
* Remove the polo with a spatula and repeat the polo making process.
* Serve them warm with chutney of your choice.

Saturday, April 3, 2021

Uppu Huli Dose / Pathrode Dose

It is good to be back after the brief hiatus I had from blogging. I am going to post a few regional recipes from the south Indian state of Karnataka this week. The first one in the series is going to be a popular breakfast recipe from the coastal regions of Karnataka called uppu huli dose. Uppu means salt and huli means sour while dose pronounced 'though-say' is the local term for the popular south Indian breakfast crepe called dosa.  
These dose make a great alternative to regular dosas and the fact that the batter doesn't need any fermentation is an added bonus. All one needs to do is soak rice for a few hours and then grind with spices. The final batter would be slightly spicy, sweet and sour. One can add vegetables like any chopped greens, ridge gourd, or cabbage to the batter to make the dose more nutritious. These dose can be served with or without any side dish.

Ingredients for dose batter:
1 cup rice
1/2 cup fresh or frozen shredded coconut
3 - 4 dried red chili
1 tbsp. sized tamarind ball
1 heaped tbsp. coriander seeds
1 heaped tsp. cumin seeds
1 tbsp. jaggery or to taste
Salt to taste
About 1 cup water to grind the batter
Oil to make dose

Note:
1.
There is no need to use sona masuri / Basmati kind expensive rice to make these dose. I used extra long grain rice which is available in bulk at Costco / Sam's club. 
2. If using frozen coconut, nuke it in a microwave for a minute to thaw it. 
3. Byadagi variety chilies lend a reddish color to dose.

Directions:
* Rinse, drain and soak rice in water for about 3 to 4 hours. Drain the water completely from rice after the soaking period. Add everything except oil to  a blender / mixer and grind them together to a fine batter. Transfer the ground batter to a container.
* Heat a griddle and pour a ladleful of batter at the center of it. Spread it into a circle with the back of the ladle. 
* Drizzle few drops of oil around the edges and cook it covered at low medium flame.
* When the bottom side is cooked, flip it and cook the other side as well.
* Remove and serve it warm with butter / yogurt or coconut chutney.

Wednesday, November 11, 2020

Instant Appam

I had made these instant appam for my Kerala breakfast platter that was a part of 'Thaalis & Platters' that I posted during September. Idiyappam was originally on my mind when I thought of that platter but decided to include another dish at the last moment. These appams that I found on YouTube came to my rescue (I however forgot to note the link.) which are an instant version. Unlike the traditional version appam posted here, this appam batter does not include any yeast and needs no fermentation overnight though the batter needs to rest for a short amount of time. The instant appam batter instead has an unusual addition of fruit salt that is not typically used in south Indian cooking which make these appam softer and fluffier. These appam make a great breakfast / brunch item on a weekend or even during weekdays if one doesn't mind the short resting period of the batter.
Traditional appam are pancakes / dosas prepared with a fermented batter of rice and coconut and are popular in the south Indian states of Kerala and Tamil Nadu. The appam are bland on their own and are usually served with a savory condiment / side dish. These thin breakfast pancakes are typically bowl shaped since they are made in appachatti, a cast iron frying pan that is rounded at the sides and looks like a shallow bowl. I followed the recipe exactly including making them on a griddle instead of a curved pan similar to a wok and so these don't have the typical appam shape. Also they were made thicker. I had served them with kurma and kaara chutney.
Ingredients:
2 cups rice flour
1/2 cup cooked rice
1/2 cup shredded coconut, fresh or frozen
Salt to taste
1 tsp. sugar
1 to 1.5 tbsp. Eno's fruit salt
Oil to make appam

Directions:
* Thaw coconut if using frozen. Grind rice flour, rice, coconut, salt and sugar together into a smooth batter of pourable consistency, adding water as needed. (One may need about 2.5 cups of water.) 
* Pour the batter into a container, cover and let the batter sit for at least half an hour. (I let it to rest for a couple of hours.) Add any extra water if needed at this point.
* Add fruit salt 
just before making dosas and sprinkle a tbsp. of water over it. 
* Mix gently to combine, yielding a frothy mixture.
* Heat a griddle / tawa and pour a ladleful of batter at the center and don't spread it. 
* Add a tsp. of oil around the edges and when the appam appears dry  on the surface, flip it.
* Cook for few more seconds until the bottom side gets cooked as well and transfer the appam onto a plate using a spatula.
* Repeat the steps of making appam with the remaining batter.
* Serve them warm with a side dish.

Sunday, October 25, 2020

A - Z Karnataka Recipe Series ~ W for Watermelon Rind Dose / Kalingana Polo

I did not have to think much about the alphabet 'W' in this series as I was set on this watermelon rind dose recipe early on. I could not think even one recipe from Karnataka with a local name that starts with the letter 'W'. In fact I have saved this recipe for ages in the hopes of doing a Karnataka recipe series in the alphabetical order some day. Mysore pak, hitakida bele saaru, nuchinnunde, some of the classic recipes were not posted on my blog until this series for the same reason.
This watermelon rind pancakes called kalingana polo is a traditional recipe from Konkani households. Dosa, the popular south Indian breakfast is called dose (though-say) in Kannada whereas it is called polo in Konkani. It is one of those recipes which shows how our ancestors in the agrarian economy had been frugal and nothing went wasted in their kitchens. The white part of the watermelon rind which is usually tossed away after enjoying the fruit is used in these dose preparation. The white rind is crisp with a very mild flavor and is used in preparation of other dishes as well.

These dose are not instant and needs advance planning. The ingredients need to be soaked, ground and fermented overnight similar to regular dose. These are soft and spongy in texture like surnoli / set dose. One cannot even notice the watermelon flavor here. In fact one can hardly notice these dose being any different from the regular version except these being softer. The yummy dose go well with any spicy accompaniment like the regular dose.
I find summer to be the best time to prepare these dose when the watermelons are available in abundance. I freeze the white part of the rind after enjoying the fruit so that I can have access to it even during winters when the fruits are not found. Any cheap quality rice will work for dose recipe, if living in India. I use extra long grain rice for my dose which they sell in bulk at Sams / Costco stores. 

Ingredients:  (Yield - about 9 to 10 dose)
1 cup rice
1 tsp. fenugreek seeds
1 cup puffed rice or flattened rice (I used puffed rice.)
1 heaped cup of white watermelon rind
1/4 cup fresh / frozen grated coconut 
Salt to taste
1/2 cup water
Oil to make dose


Prep work:
*
Rinse rice, fenugreek seeds and flattened rice (poha) if using with water and drain. Soak them in water for at least 3 to 4 hours. If using puffed rice / murmura instead of flattened rice / poha then just rinse them before grinding the dose batter.
* Cut the red fruit from the watermelon and you will be left with the outer green skin and the white rind.

* Carefully remove the white part with a knife and discard the outer green part.

* Drain the water used to soak the rice or save about half a cup to grind the batter and drain the rest.

* Thaw if using frozen coconut. First grind together watermelon rind and coconut. Then add soaked rice and fenugreek seeds, rinsed puffed rice / flattened rice, coconut and salt. Grind into a thick and fine batter adding water as needed. (I used about half cup. You can use the water that was used in soaking the rice. If you live in a hot climate, salt can be added before making the dose instead.)
* Transfer the ground batter to a container, cover it and leave it in a warm place overnight to ferment. (I ground the batter the previous evening at around 4 pm and made dosas for the breakfast next morning. Basically I left it to ferment for about 15 hours.)
* The batter in this case won't rise dramatically but it will become thicker and porous and you can lightly smell the fermentation.

* Heat a tawa and pour a ladleful of batter at the center and don't spread it. 
* Add a tsp. of oil around the edges and COVER it with a lid. You will start to notice holes developing and when the dose appears dry  on the surface, flip it.
* Cook for few more seconds until the bottom side gets cooked as well and transfer the dose onto a plate using a spatula.

* Repeat the steps of dose making with the remaining batter.
* Serve them warm with a chutney any spicy accompaniment. Mine were served with vegetable saagu and chutney pudi.

Saturday, October 24, 2020

A - Z Karnataka Recipe Series ~ V for Vangi Bhath

Vangi bhath is a delicious eggplant rice preparation that originated in Karnataka. It is one of the popular vegetarian rice preparations in the state along with bisibele bhath, kayi sasive anna, puliyogare which are common festive dishes among the Brahmin community. All the four recipes have been already posted in my blog and check here for the links to those, if interested. I have posted a vangibhath version earlier which is frequently prepared and enjoyed at my home. In that version, eggplant and potato slices are fried which makes the dish extra special. Today's version is Karnataka style which is prepared slightly differently than that version.  
A second vangi bhath in the series was not part of my original plan. My camera needs some fixing and I have not been able to use it for the past few weeks. I had prepared this bhath for some reason a few weeks ago which came handy now and ended up being my 'V' dish instead of a Konkani dish I had planned earlier. 

As the name suggests, eggplants are the star of this dish and a good quality vangi bhath powder makes a difference in how the final dish turns out. MTR brand one is good if one has never tried the homemade version. The spice powder can be made in advance and it stays fresh for months even if not refrigerated. I usually make a big batch and use it to make quick rice preparations. The other combination of vegetables used in Karnataka to make rice dishes using vangi bhath powder are 

1. Fenugreek greens, potato and peas in menthya bhath
2. capsicum, potato and peas in capsicum bhath
3. Carrot, beans, potato, peas in tarkari bhath


Ingredients for the vangibhath powder:
1 tbsp. split chickpeas / chana dal
1 tbsp.  skinned black gram / urad dal
1/2 to 1 tbsp. coriander seeds  
2 cloves
2 one inch cinnamon pieces
2 tbsp. grated dry coconut
3 dried spicy variety red chillies 
3 Byadagi chillies for color

Vangi bhath powder preparation:
* Dry toast the split chickpeas and black gram until they start to turn reddish. Then add the remaining ingredients and sauté until the coriander seeds turn a shade darker.
* Remove from heat and cool the ingredients. Grind them to a fine powder. Store it in a bottle with a tight fitting lid if not using immediately.


Ingredients for vangi bhath:
1 cup sona masuri rice
3 - 4 tbsp. oil
2 tbsp. cashews
1 tsp. split chickpeas / chana dal
1 tsp. mustard seeds
1 sprig of curry leaves
2 pinches of asafoetida powder
1/8 tsp. turmeric powder
6 baby eggplants, stalks removed and sliced thin lengthwise
1/4 tsp. jaggery powder or as needed
2 tbsp. tamarind water (not thick puree) *
3 tbsp. vangi bhath powder or as needed (recipe above)
Salt to taste
*  Soak a small ball of tamarind in water and squeeze the tamarind. Use the thin tamarind water and not the thick puree. If using thick puree, use less and as needed.

Directions for vangi bhath:
* Rinse and cook rice adding water as needed in a pressure cooker or rice cooker and keep it aside. Let it cool a bit. (I add about 1 and 3/4 cups of water to cook rice.)
* Heat oil in a kadai or a big non stick pot. Add the cashews and toast them till they turn golden brown. Remove them with a slotted spoon and keep aside if you want them to be crunchy. Add split chick peas and mustard seeds to the same oil and sauté until the split chickpeas start turning reddish. Then add curry leaves, asafoetida, turmeric and eggplant slices.
* Cover and cook until eggplants are done, not turning them mushy. (My eggplants took around eight minutes to cook.) 

* Add jaggery, tamarind water, vangi bhath powder as needed and salt to the pan and cook for 3 - 4 minutes.
* Then add the cooked rice and mix gently without mashing the eggplant pieces until all the rice is coated well with the spicy mixture
* Taste and adjust the seasonings if needed. Garnish with the toasted cashews and serve warm.