HOME        |        ABOUT        |        COPYRIGHT        |        CONTACT        |         RECIPE INDEX        |         INDIAN THAALIS        |         MILLET RECIPES        |        EVENTS' ROUNDUP        

Showing posts with label Sago / Sabudana. Show all posts

Friday, September 10, 2021

A - Z Idli Series ~ S for Sabbakki Idli / Sabudana Idli / Saggubiyyam Idli / Sago Idli

There is an instant version sabbakki / tapioca pearls idli in Karnataka cuisine which is made with the tiny sized tapioca pearls soaked in yogurt. The idlis prepared with the batter are usually thinner than the standard version that are made with skinned black gram and rice. The idea to these idlis came after a conversation with my mother where we wondered whether tapioca pearls can be added to the regular idli batter. I experimented adding them to idli batter, without changing the proportions of rice and black gram. I found those idlis slightly on the dry side and so replaced a portion of rice with tapioca pearls instead. 
These soft and fluffy idli look cute with the tapioca pearls studded like tiny pearls through out. They make a great breakfast or brunch item when served with chutney and / or sambhar. These idlis are obviously vegan, gluten free and also are fatfree. 
So far in this series -
Ingredients: (Yield - 16 idlis)
1 cup idli rice / idli rava
1/2 cup skinned black gram / urad dal
1/2 cup sago / tapioca pearls / sabudana / sabbakki
2 tsp. salt
3/4 cup water
Ghee / oil to grease the idli moulds

Directions:
1. Add black gram and idli rice to a bowl.  
2. Rinse idli rice and skinned black gram with water, rubbing between fingers and drain. Soak them together in water for about 4 - 5 hours. (If using idli rava instead of idli rice, soak it and black gram separately). 
3 & 4. Rinse and soak tapioca pearls in water in another bowl.
5. Drain the water from rice - black gram mixture and add them to a grinder / blender. Grind the mixture adding salt and enough water to a smooth and thick batter with pourable consistency. (Grind black gram first if using idli rava. Then add the soaked and drained idli rava and mix well. There is no need to grind the idli rava. Salt can be added just before making idlis if the local weather is warmer. )
* Transfer the mixture to a container, big enough to allow some space for the batter to rise during fermentation. 
6. Drain the water that was used to soak tapioca pearls as well, squeezing them gently if needed. Add these tapioca pearls to the ground batter and mix well. 
7. Cover and leave the mixture to ferment overnight, in a warm place especially if the weather is cooler. 
8. The batter may take anywhere between 8 to 16 hours to ferment, depending upon the local weather. 
* Grease the idli moulds with ghee / oil.  Fill the moulds with batter.
* Place the idli stand in the prepared cooker / steamer and close the lid. Don't use the valve for the lid if using a pressure cooker.
7. Steam the idlis on low heat setting until done. (The idlis should not stick when touched with moist fingers.) Check the water level in the steamer base and add extra if needed.
* Wait for about 10 minutes and then remove the idlis by running a spoon around the edges.
* Drizzle melted ghee over the idlis and serve them with a chutney and /or sambhar. Mine were served with peanut chutney and sambhar.
* Refrigerate any left over idlis and use in a day or two. Or they can be cooled down immediately after preparation and frozen to use later. Just nuke them in a microwave, covered and enjoy hot, piping idlis when needed. 

Saturday, July 10, 2021

A - Z Idli Series ~ M for Mallige Idli

So far in my idli series,
D for Dal Idli
J for Jowar Idli
L for Lauki Idli

Here are some spongy and pillowy soft idlis from Karnataka called mallige idli, for some breakfast indulgence. These idlis which are popular in the Mysore area are made with rice, urad dal, along with the addition of flattened rice and tapioca pearls. These idlis are named after another specialty of the region, Mysore mallige, a renowned variety of jasmine flowers in the state. It is an allusion to the color and texture of these idis.
The texture of these plump and soft mallige idlis is so splendid that I would recommend it to all idli connoisseurs out there. This is a 'must try' idli and I prefer them over the regular version idlis any day.  There is a similar version of idlis  in Tamil Nadu called khusboo idli, named after a popular south Indian actress. 
The recipe of these idli vary from home to home and this dish needs some advance planning as the ingredients need to be soaked, ground and fermented. The secret behind 'perefct' idlis is always well fermented batter and here are some tips to make good idlis. These idlis pair superbly with coconut chutney and serve it with sambhar to make it a complete meal. We enjoyed our mallige idli with peanut chutney and tomato - onion chutney.

Ingredients: (Yield - 32 idlis)
2 cups idli rice / Selam akki
1/2 cup / skinned black gram / urad dal / uddina bele
1/2 cup flattened rice / poha / avalakki
1/4 cup tapioca pearls / sago / sabudana / sabbakki
Water to grind (I used about 1 & 3/4 cups.)
2 tsp. salt or to taste
Directions:
1. Rinse idli rice, skinned black gram, flattened rice and tapioca pearls together and drain. Soak them together in water, in a wide bowl for about 4 to 5 hours and drain the water used to soak completely.
2. Grind them together adding salt and water, only as much needed to grind them into a smooth and thick batter. (The salt can be added just before making idlis if living in a warm climate. I add it while grinding since I live in a cold climate and the batter takes longer to ferment.)
2. Transfer the batter to a container large enough to allow the batter to raise during fermentation. (Compare the pictures 2 and 3 to see the volume of the batter increasing after fermentation). Cover the container and allow it to ferment overnight (if the batter was ground in the evening) or for about 10 - 12 hours in a warm place. If living in a cold climate, leaving the batter in an oven with the lights on (without turning on the oven) helps. Or use yogurt setting in an instant pot.

3 & 4. The fermented batter looks like above in the picture - thicker than when grounded, airy, and slightly sour smelling. 
* Heat about 2 cups of water in a idli cooker base or a idli cooker or a steamer on medium heat. 
* Grease the idli moulds with ghee / oil. 
* Gently stir the batter a couple of times with a ladle. 
5. Ladle the batter into the idli moulds carefully without spilling.
 Place the idli stand in the prepared cooker / steamer and close the lid. Don't use the valve for the lid if using a pressure cooker.
6. Steam the idlis on low heat setting for about 20 - 25 minutes or until done. (The idlis should not stick when touched with moist fingers.) Check the water level in the steamer base and add extra if needed.
7. Wait for about 10 minutes and then remove the idlis from idli stand. 
8. Remove the idlis by running a spoon around the edges.

Serving the idlis:
Drizzle melted ghee over the idlis and serve them with a chutney, and sambhar if preferred. Mine were served with peanut chutney and tomato - onion chutney.

What to do with leftover idlis:
1. Refrigerate the left over idlis and use in a day or two. 
2. Or they can be cooled down immediately after preparation and frozen to use later. Nuke them in a microwave, covered and enjoy hot, piping idlis when needed. 

Tuesday, June 5, 2018

Saggubiyyam - Kobbari Payasam / Sago and Coconut Kheer

A sweet pudding made with sago, jaggery and coconut

Growing up, the standard payasams cooked at home were either rice based paramannam or sago based one until the ready made vermicelli started selling in the market. To be honest, I did not use to appreciate the sago payasam as I do now. Sago kheer started to a become a regular feature somehow when I had my own home and hearth, and acquired the status of being a favorite payasam

I decided to switch to jaggery this time and also threw some coconut at the last moment. The resulting payasam was tasting so good that I have decided to stick to this new version in the future. The final payasam is creamy and delicious and has no resemblance to the stand version in any manner. Give this a try if you are looking for a payasam recipe and I assure that you would not get disappointed. 
Ingredients: (Yield 2 servings)
1/4 cup sago / saggubiyyam
1/4 cup shredded fresh coconut
1 cup milk
1/2 powdered jaggery
2 cardamom pods
1 tsp. ghee
1 tbsp. cashew nuts


Method:
* Rinse and soak sago for about 10 minutes in water. Drain and wash away the starch powder. I do it to get rid of some of the starch but this step is however optional.
* Choose preferably a non stick pot or a non stick sauce pan to cook kheer. Add drained sago and a cup of water and cook on low flame, stirring occasionally. Cook until all the sago pearls become transparent. 
(Starch keeps building up while cooking the sago and tends to stick to the bottom of the pan if not stirred intermittently. If one finds cooking sago tricky because of the starch buildup, follow this step. When the water used to cook sago becomes starchy, add another cup of cold water. Sago pearls go to the bottom of the pan and then throw away all the (starchy) water from the pan. Add a fresh cup of water to the sago and continue to cook. This step can be repeated one more time while cooking sago.)
* Crush the cardamom pods using a mortar and pestle. Grind the cardamom seeds fine. 
* Throw away all the water in the pan when the sago pearls become transparent. Add fresh coconut, jaggery, milk and cardamom to the pan. Cook on low flame until the jaggery melts and milk starts to boil. Turn off the stove.
(I usually add milk and jaggery together and it has never curdled. Touch wood. In case, if you feel milk is going to curdle because of the addition of jaggery, milk may be separately boiled in another pan, cooled and added finally.)
* Heat ghee in a small pan and add cashews. Toast them until they turn golden brown. Add them to the kheer along with the ghee and give a quick stir.
* The kheer can be served warm or chilled.

bmlogo
This goes to Blogging marathon # 89, under the 'Indian Sweets - Payasams' theme. Check out the page here to read what other marathoners are cooking.

Comments

Sunday, February 18, 2018

Sabudana Khichdi / Saggubiyyam Upma


Sabudana khichdi is a popular dish in some parts of India, especially in the state of Maharashtra. As the title indicates, the khichdi is made using sabudana / tapioca pearls. It can be eaten for any meal of the day and is considered as one of the fasting foods given that the regular salt in the recipe is replaced by rock salt.

This khichdi requires a bit of advance preparation since the tapioca pearls need soaking until they turn translucent and soft. The time of soaking depends upon the variety of tapioca pearls used. Some need only a few minutes of soaking where as some need 4 to 5 hours of soaking. I don't soak tapioca pearls in plenty of water but instead use only enough water to cover them. I cover the tapioca pearls' bowl and forget for few hours. Usually they absorb all the water by that time and would have turned translucent and fluffy, ready for use.

Grated ginger, fresh shredded coconut and sugar can be added as well to the recipe though I don't use them.

Ingredients: (Yield 2 servings)
1 cup sabudana / tapioca pearls
1/2 cup peanuts
1 medium sized potato
1 tbsp. oil
1 tsp. cumin seeds
10 curry leaves
1 or 2 green chillies, finely chopped
Salt to taste
Lemon juice to taste
Minced cilantro to garnish

Prep work:
* Rinse tapioca pearls in a colander under running water until it is not cloudy anymore. This helps to get rid of the starch to some extent. Soak tapioca pearls in a bowl by adding water just enough to cover them. Cover the bowl and leave aside for 4 to 5 hours or overnight. 
* Press a soaked pearl between thumb and forefinger to check whether it easily squishes. If not, sprinkle some more water and soak for some more time. (My tapioca pearls took about 5 hours to soak.) Drain any extra water if present.
* Toast the peanuts and skin them. Save about 2 tbsp. peanuts and coarsely grind the rest of the peanuts.
* Peel and cube the potatoes.

The cooking part:
* Heat oil in a pan, preferably a non stick one and add cumin seeds. When they start to brown, add curry leaves and chillies. Saute them for about 20 seconds and add potato cubes. Cover and cook on low flame until the potato cubes turn tender.
* Mix soaked tapioca pearls, peanut powder and salt in a bowl. Add them to the pan and cook covered on low flame until tapioca pearls turn slightly translucent.
* Garnish with cilantro and the saved peanuts.
* Squeeze some lemon juice while serving or it can be added while cooking tapioca pearls.

bmlogo
This goes to Blogging marathon #85, under the theme 'Breakfast Recipes'. Check out the page to read what other marathoners are cooking.

Comment

Thursday, March 26, 2015

Sabudana Laddu

 
I chose to cook with sabudana this week just because I had around 5 to 6 pounds of sabudana lying in my pantry and as far as I remember I haven't posted a single sabudana recipe so far. Growing up I saw my mother using sabudana / saggubiyyam basically in two recipes - a payasam (that was less preferred over the vermicelli one) and the saggubiyyam vadiyalu or the vadi. Later on came the sabudana dosa, sabudana vada and the khichdi to my life when I had my own home and hearth. For today's post it was decided that I would do a dessert and kheer seemed like an easy way out. I have grown a penchant towards the sago kheer over the years and besides, my son loves it too. However change in plan happened because of Ugadi. I thought of preparing something with sabudana for the neivedyam and this laddu came to the rescue. The laddus were so yum and appealing that even my sweet-phobic husband ate a couple of them without any coaxing from me. They looked so tempting to him that he wanted to taste a bit of it and couldn't stop himself from tasting more. That means a lot coming from a person who wouldn't even glance the sweet dishes.

Ingredients:(Yield 15 - 16 laddus)
1 cup sabudana / sago / tapioca pearls
1 cup powdered sugar (or adjust the quantity)
1/4 tsp cardamom powder
2 tbsp. ghee
1 Tbsp. raisins
1 Tbsp. cashews
Extra ghee / milk to shape the laddus

Method:
* Dry toast sabudana on low flame, continuously stirring until they turn slightly brownish. It would take around 15 - 20 minutes to toast sabudana this way. The hard sabudana would have attained a crunchy texture by the time toasting is done. Transfer the sabudana to a wide plate and let it cool.
* Heat 2 tbsp. ghee in a small pan and add raisins and cashews. Stir and toast them for few seconds until the raisins turn plump and cashews turn golden brown. Turn off the stove and keep the pan aside.
* Grind the toasted sabudana to a fine powder. This step can be done in batches. Grind the mixture and sieve it if it appears coarse. Collect the fine powder and again grind the coarse powder left in the sieve and repeat the process until you are left with finely ground sabudana.
* Combine the ground sabudana, sugar powder, ground cardamom and the toasted cashew-raisin mixture along with the ghee in which they were toasted in a mixing bowl. Add extra melted ghee / milk to the mixture until you are able to hold it together. 
* Shape lemon sized balls out of the mixture by rolling between your palms.
* Store them in an airtight container.

Notes:
1. In case, one doesn't prefer to use that much of ghee in the recipe, warm milk can be substituted instead to shape the laddus. 3 to 4 tbsp. milk should suffice to make laddus. Please note to add ghee / milk in small increments instead of dumping it all into the mixture at once. If it becomes too wet, you need extra sabudana powder to fix it and extra sugar to balance the flavor and so add milk/ghee in little quantities, combine the mixture and check whether the laddus can be made or not. 
2. If milk is used to make laddus, they would turn harder after a few hours. They just need to be warmed in the microwave for few seconds before consuming them. I used milk to make these laddus and didn't refrigerate them. We ate them in about four days and they stayed fresh for that long.

This goes to Blogging Marathon #50, under the theme of "One ingredient - Three different dishes", Sabudana / Sago / Tapioca pearls being my chosen ingredient. Check out the link to find out what other marathoners are cooking.

Comments

Wednesday, March 25, 2015

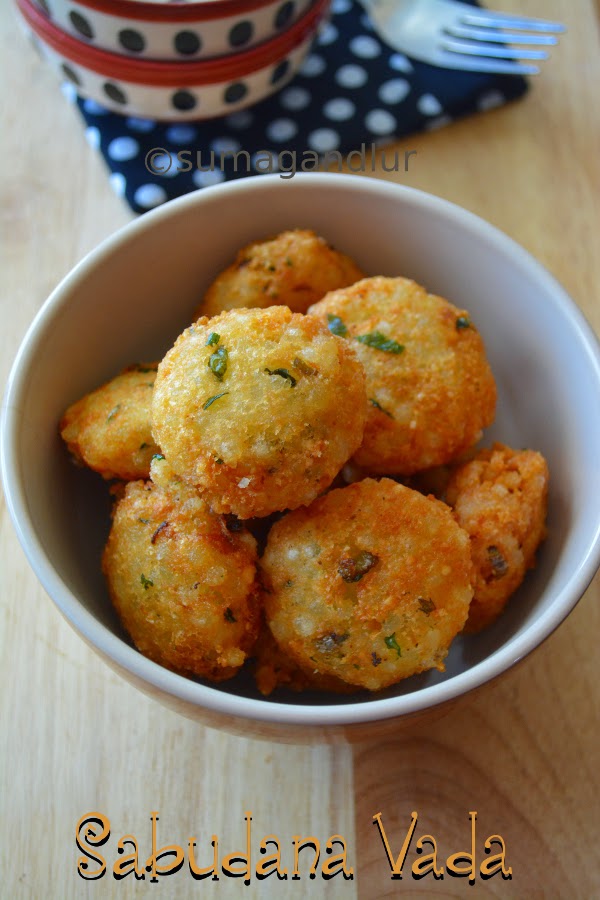
Sabudana Vada / Sago Vada

Honestly speaking, fasting during navratri or the fasting food aka 'vrat ka khana' is an alien concept to me as a south Indian. As a vegetarian, I know that onion and garlic are taboo during religious occasions and rice is not consumed sometimes when fasting. However I had no clue that there is a long list of ingredients that people wouldn't consume during fasting in other parts of the country until I moved to U.S. and saw some of my Indian friends fasting at the drop of a hat in the name of festivals.  
Sabudana or tapioca pearls is one of the ingredients that is allowed during fasting and can be used to prepare yummy, light snacks such as khichdi or vadas. Sabudana vada, a traditional deep fried snack from Maharashtra is also equally popular as a fasting food. They are yummy but the flip side is that they are deep fried and need a bit of pre-planning since sabudana needs soaking. This 'crunchy on the outside and softer inside' vadas make a great snack along with your evening cup of tea.
 
Ingredients:
1 cup sabudana / sago pearls
2 small sized potatoes
1/4 cup peanuts
2 -3 green chillies, finely chopped (adjust the quantity as per preference.)
1 - 2 tbsp. finely minced cilantro
Salt to taste (or rock salt if fasting.)
1 Tbsp. rice flour (optional and if fasting, rice flour can be replaced with buckwheat flour or chestnut flour.)
Oil to fry (I used canola oil. Vegetable / peanut oil can be substituted.)
  
Preparation:
* Soak sabudana in just enough water to cover them for about 2 - 3  hours or overnight depending upon the sabudana variety. Drain in a colander and keep it aside until all the water is completely drained. (check notes.)
* Peel and cook the potatoes in a pressure cooker. Drain completely and then mash finely.
* Roast and skin the peanuts. Grind them coarsely and keep aside.

Method:
* Heat oil in a kadai / frying pan to deep fry the vadas.
* Add soaked and drained sago pearls, mashed potato, peanut powder, green chillies, cilantro, salt and flour if using to a wide bowl. Mix well to combine. 
* Pinch about lemon sized portions from the mixture.
* Gently pat them into patties and gently slide them into hot oil. Fit as many patties as the pan could hold without overcrowding.

* Deep fry them until they turn golden brown and are done.
 Notes:
1. I have used large sabudana pearls here. The soaking time depends upon the quality and the variety of sabudana. I have heard from my mom that the best quality sabudana needs just sprinkling of water to make the pearls soften but the variety I usually get here requires overnight soaking. Some soften in lesser time than the other and so check accordingly. When you press a soaked sago pearl between your finger tips, it should be moist and spongy.)
2. I usually deep fry keeping the flame at somewhere between low and medium. Vadas cooked at high temperature would brown faster leaving the insides uncooked while a low cooking temperature would make vadas greasier.
3. During fasting months, amaranth flour / buckwheat flour or water chestnut flour can be substituted for rice flour and rock salt can be used in place of regular salt.
4. For a healthier version, they can be shallow fried in a appe pan.
5. Minced ginger, 1 tsp of sugar or lemon juice can also be added to the recipe.

This goes to Blogging Marathon #50, under the theme of "One ingredient - Three different dishes", Sabudana / Sago / Tapioca pearls being my chosen ingredient. Check out the link to find out what other marathoners are cooking.

Comments

Tuesday, March 24, 2015

Saggubiyyam Dosa / Sago Dosa


My 3 year old niece is close to me despite the distance barriers. She makes sure that the adults at home call me frequently so that she can share the so called 'fun' things happening in her life. I got a similar call from her yesterday and the tiny one was all excited to share the news that she received 4 medals  in her pre-school sports day event, including the one for hosting the event along with her teacher in front of an audience of 100 plus. It is a remarkable feat considering that no one cannot elicit a single word from her in front of strangers though she talks a dozen to dime with those who are in her 'friendly' zone. Everyone at home is usually happy to hear her pleasant chatter and it is hard for us to escape from her charming and strong persona. Even my 16 year old who acts as if he is reclusive and doesn't show an iota of enthusiasm when he wins state and national level competitions at school couldn't escape from the excitement his little cousin was spreading and was chatting away enthusiastically with her sharing her sense of pride. 
My sister was mentioning that her daughter was acting as a mini adult these days and behaving so mature for her age. Gradually the conversation veered towards the food in general and the little one's preferences in particular. It seems that her daughter was bored with the same kind of dosas she was making and asked me for some varieties to rotate. For people who are in the same boat like my sister, here is one dosa made with sago. These dosas taste good when served warm along with a spicy chutney.

Ingredients:
1 & 1/2 cups rice (I used extra long grain rice.)
1/2 cup sago / tapioca pearls (Saggubiyyam)
Buttermilk (Majjiga)
Salt to taste
Oil to make dosas ( Canola / vegetable / peanut oil)

Method:
* Soak rice and sago pearls together for about 4 - 5 hours in water such that they are immersed well in water. Wash and drain the water after the soaking period.
* Grind rice and sago together finely into a thick batter, using butter milk. In absence of butter milk, add equal quantities of yogurt and water.
* Transfer the ground batter to a big container, add salt and mix well. Cover and allow the batter to ferment overnight. (I usually soak the ingredients in the afternoon, grind the batter in the evening.)
* When ready to make dosas, heat a griddle or a shallow pan. Pour a ladleful of batter at the center of the griddle and spread thinly into a 6 inch circle using the backside of the ladle. Drizzle 1/2 tsp oil around the edges and cook until the bottom side of the dosa turns light golden. Flip the dosa using a spatula, drizzle about 1/4 tsp oil around the edges and cook for about 20 seconds and remove.
* Repeat the dosa making process using the remaining batter.
* Serve dosas warm with roasted chickpea / peanut chutney.

This goes to Blogging Marathon #50, under the theme of "One ingredient - Three different dishes". I have decided to showcase three different dishes this week using Sabudana / Sago / Tapioca pearls. Check out the link to find out what other marathoners are cooking.

Comments

Monday, May 5, 2014

Sabudana Thaalipeet

Theme: Unused posts from BM #39 
Day 3: Maharashtra

I found this recipe in a Sanjeev Kapoor cookbook and the idea of sabudana thalipeeth was interesting to me as I am more used to the flour versions. Like the other sabudana / tapioca pearl dishes, these thaalipeet are meant for fasting / vrat. The ingredients that go into this thaalipeet are similar as in the case of sabudana vadas and so the following mixture can be used to make vadas too. And it is another thing that vadas would be a high calorie version and more yummier. These thaalipeet need a little bit of prior preparation as the sabudaana needs soaking and they would be a great evening snack if not fasting. 
Ingredients:
1/2 cup sabudana
1/4 cup roasted and coarsely ground peanuts
1/4 cup sago flour (or substitute with rice flour)
1 medium potato - boiled, peeled and mashed
1 medium raw potato - peeled and grated
3 green chillies - stemmed and chopped
1/2 tsp red chili powder
Salt to taste
2 Tbsp minced fresh cilantro
2 Tbsp oil
Method:
* Put the sago in a large bowl and add enough water to cover it. Soak for about 3 - 4 hours and drain in a colander.
* Transfer the drained sago to a large bowl and add all the other ingredients except oil.
* Combine everything and divide the mixture into 4 portions. Shape them into balls.
* Place a griddle over medium heat and add 1/4 tsp oil.
* Grease thick plastic sheet and place a sago ball on it. Flatten the ball into 6 inch circle with moistened fingers. Gently transfer the circle onto the griddle and peel the plastic sheet of.
* Or pat the circle directly on the griddle before turning on the heat like I did.
* Add 1/4 tsp oil around the edges. Cook until the bottom side turns golden brown. Flip and cook until the other side turns golden brown.
* Repeat the process with the remaining sago balls.
* Serve warm with any chutney.

Monday, November 18, 2013

Kuzhi Paniyaram / Guntha Ponganalu


Soft and spongy ponganalu / paniyaram can be a perfect mess-free lunch / snack item for kids since they don't even need a side dish. They happen to be one of my son's favorite lunch box item since his kindergarten days. When he was young, I just used to pack them, cut in halves along with a fork and the box used to come empty. Of course now he is older and I pack a side dish too.
I follow my mother's recipe usually but previously during one of the marathons I had come across this recipe. I was intrigued to see idli rice and sago in the recipe and had tried it immediately. Trust me, this recipe is a keeper. I was so glad that I thought of giving this recipe a try. It yields soft, flavorful and very tasty paniyarams.

Ingredients:
1 cup idli rice
1/2 cup raw rice (I used extra long grain rice)
1/4 cup sago / sabudana
1/4 cup skinned black gram / urad dal
1 tsp fenugreek seeds / methi seeds
Salt to taste
2 onions - peeled and finely chopped
2 tbsp minced coriander leaves
For seasoning / tadka:
2 tsp oil, 1 tsp mustard seeds, 1 tbsp chana dal, 1 tbsp urad dal, few minced curry leaves and 2 minced green chillies if not serving kids

Method:
* Soak rices, uard dal, sago and fenugreek seeds in sufficient quantity of water for 4 - 5 hours.
* After the soaking period, discard the water, wash the mixture with fresh batch of water. Grind them fine using water as needed to form a thick batter. The batter should not be runny. Add salt and mix well. Allow it to ferment overnight in a warm place or about 8 - 10 hours.
* When ready to prepare paniyarams, heat oil in a small pan. Add mustard seeds, urad and chana dals to the oil. When dals start turning reddish, add the minced curry leaves and green chillies if using.
* Add this tadka, minced onion and cilantro to the fermented batter and mix well.
 

* Heat the ponganalu skillet and add a few drops of oil in each mould. Then fill them with batter.
* Cover the ponganalu skillet with a lid. Turn down the heat and cook for about 5 minutes or till the ponganalu batter doesn't appear raw.
* Then flip them, add a drop or two of oil and cook till the other side lightly browns as well.
* Repeat the process with the remaining batter. Serve warm paniyarams with chutney.  
They store well in refrigerator for 2- 3 days. And they freeze well too for a handy breakfast on a busy work day.

This is going to be my contribution to "Mess-Free Kids' Snack / Lunch Dishes". Check what other marathoners are cooking at BM #34.

Comments 

Friday, May 17, 2013

Mango - Sago Kheer / Mango - Tapioca Pearl Pudding


Blame my luck, I couldn't get hold of mangoes either raw or a good variety of ripened ones when I chose to post mango based recipes  this week for BM#28. The kesar mango pulp can I had in my pantry came for my rescue for my Day 1 post. If I cannot get hold of some mangoes even during this week's grocery trip, the other two recipes are also going to end up being made with the pulp. :)
I usually prefer the commercially sold sweetened puree of the kesar mango variety when making aamrakhand or the cake because of the beautiful, vibrant hue it imparts to the dishes. For today's recipe, I chose to go with a kheer that is simple, quick and yummy. I had previously tried this mango version kheer with both vermicelli and rice. And so thought of trying with sago today as the previous versions were liked at home. Using readymade pulp of course reduces the mess and this kheer is done in no time. It is done faster than the vermicelli kheer.

Ingredients: (2 servings)
2 Tbsp sago / sabudaana (I used fine variety)
3/4 cup milk
1/2 cup kesar mango pulp
Sugar / sweetener only if needed
1/2 tsp cardamom powder

  
Method:
* Wash sago and cook in a pressure cooker for 1 whistle adding a cup of water. If using not fine variety, sago can be cooked up to three whistles. Or the sago can be cooked in a nonstick sauce pan on stove top until sago is cooked. The sago would look transparent when properly cooked.
* Pour the cooked sago into a fine meshed sieve or a tea strainer and wash with plenty of water to get rid of the starch.
* Boil milk in another sauce pan and add the cooked sago. Add cardamom and cook for a couple of minutes more. Turn off the stove and let the mixture come to room temperature.
* Just stir in the sweetened mango pulp to the sago milk mixture and serve chilled if preferred.

Notes:
1. If fresh mango is being used instead of the readymade sweetened pulp, just pass the mango flesh through a blender and stir in at the end. Taste the mango and check if sugar is needed. While boiling the milk - sago mixture, add sugar if needed. Let cool and stir in the mango puree.
2. Garnish of ghee toasted raisins and cashews can be added if preferred. Or garnish with mango cubes.

Check out here to know what other participating marathoners are cooking. 

Comments

Sunday, April 21, 2013

Almond - Sago Kheer / Badam - Saggubiyyam Payasam


Sago kheer is one of the preferred kheers during summer at our home since it is considered a coolant. Recently I saw an yummier version on a TV show, combining it with almonds. Actually I should say it was like bringing together two delectable kheers - the almond kheer and the sago one, to come up with a healthy, nutritious treat. I tried it immediately and was very much impressed with the outcome and so it makes an appearance here. Also the tiny sago I used were cooked in about 5 minutes and so this kheer was a breeze to prepare. It can be a part of a festive meal or prepared to impress your guests.

Ingredients:
1/2 cup almonds
1/4 cup sago / saggubiyyam
2.5 - 3 cups milk (Boiled and cooled)
6 - 8 tbsp sugar (or adjust accordingly)
1/2 tsp cardamom powder
1 - 2 Tbsp slivered almonds to garnish (optional)


Method:
* Grind almonds into a paste adding water. 
* Heat ghee in a non stick sauce pan. Add almond paste, milk and sugar. Bring it to a boil and add sago. Cook until sago is done. My sago was done in about 5 minutes. Add cardamom powder and turn off the stove.
* This can be served chilled during summers or hot during cold weather.
* Garnish with slivered almonds.


Note:
1. There is no need to skin the almonds for this recipe. However if one prefers so, the almonds need to be soaked in water and peeled. For a quicker option, they can be nuked in a microwave with little water for a couple of minutes. The skins come off easily.
2. I added the tiny, quick cooking sago and so the kheer was done in no time.

Check what other marathoners are cooking during this month long marathon.

Comments